Monday, 30 September 2013

My lesson 1 mod. Flash 2 LEDs alternately.

After completing the 1st lesson I challenged myself to have two LEDs flashing alternately.

Hardware setup.

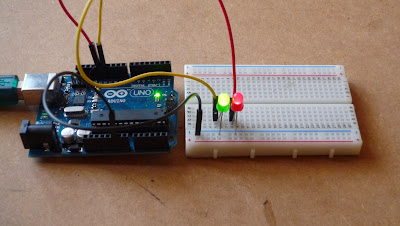
The hardware setup was straightforward and just needed another LED and an extra jumper wire. How I connected it al together.

Red lit.

Green lit.
  1. From digital pins 12 & 13 to LEDs +ve pins.
  2. LEDs -ve pins connected to ground rail.
  3. Ground rail connected to power ground pin.
  4. Done.

Software.

I built the sketch from scratch using the principals learnt in lesson 1.

// Example 01 Mod : Blinking LEDs : James Margarson 30/09/13 :
const int LED = 13; 
const int LED0 = 12;// LEDs connected to
                                   // digital pins 12 & 13
void setup()
{
pinMode(LED, OUTPUT);
pinMode(LED0, OUTPUT);// sets the digital
                                              // pins as outputs
}
void loop()
{
digitalWrite(LED, HIGH); // turns LED on
digitalWrite(LED0, LOW); // Turns LED0 off
delay(250);              // waits for 250 milliseconds
digitalWrite(LED, LOW);  // turns LED of
digitalWrite(LED0, HIGH);// turns LED0 on
delay(250);              // waits for 250 milliseconds
}

From the original example sketch I added a few extra lines of code highlighted to show my additions to control the flashing of the two LEDs.
The final result.

Friday, 27 September 2013

Getting started with my Arduino. Making a LED flash.

I recently bought myself an Arduino Uno board after hearing what can be done with one of these boards. Having no idea on how to program or the syntax of the Processing language.
I have got a copy of "Getting started with Arduino, 2nd Edition" by Massimo Banzi, ISBN: 978-1-449-309879, that makes learning the language easy explaining what code does what.

The 1st lesson in the book, Making a LED flash.

The 1st lesson is a simple introduction to using the hardware/software and a simple sketch (program) to make the LED flash. The hardware setup is very simple just an optional LED between pin 13 & ground is needed.
LED attached. Green light on, ready to go.
The sketch for the flashing LED is a introduction into the Processing language with a simple sketch that sets up an output and then runs a loop to turn the LED on and off as specified in the sketch.

The Sketch & my understanding of it

The first  sketch in the book was this simple sketch.

                    // Example 01 : Blinking LED
const int LED = 13;                    // LED connected to
                                                    // digital pin 13
void setup()
{
pinMode(LED, OUTPUT);        // sets the digital
                                                    // pin as output
}
void loop()
{
digitalWrite(LED, HIGH);         // turns the LED on
delay(1000);                             // waits for a second
digitalWrite(LED, LOW);        // turns the LED off
delay(1000);                            // waits for a second
}

How the sketch works.
 // - These are comments not read by the Arduino but are human readable notes, in this case used to describe the code.

const int LED = 13 - This means that LED is a number that can't be changed (constant integer), in this case LED is bound to digital pin 13.

void setup() - This tells the Arduino that the next block of code will be called setup()

{ } - Curly brackets are used to begin and end blocks of code

pinMode(LED,OUTPUT) - This sets the LED pin to be an output.

void loop() - This is for specifying the behaviour of the output, in this case it will repeat the code block until the Arduino is turned off. 

digitalWrite(LED, HIGH) - This turns on any pin that has been configured as an OUTPUT.

delay(1000) - This adds a delay of 1000ms before executing next command

digitalWrite(LED, LOW) - This turns off any pin that has been configured as an OUTPUT.


The sketch working.

I changed the on/off time to 50ms on/off as the 1 second flash rate was too slow. I just changed the delay command to delay(50) to speed it up.

The sketch in action.


Next Lesson: Using a push button switch to control the led.

Sunday, 22 September 2013

My new RF remote gadget.


My new 4 channel RF remote control gadget.


Nosing around Ebay the other week I came across a listing for a 4 channel RF remote control module and key fob remote,  http://www.ebay.co.uk/itm/181194171551  for only £2.57 with free delivery, so at that price I had to grab one.

The RF receiver module and it's remote.

The key fob remote.


Close up of the RF receiver PCB.


Board specifications.


I couldn't find any information online for the board but thank's to Nick, http://madmindcreations.blogspot.co.uk/, who came across this on a Ebay item page from a different seller.


Remote control
    Modulation method: Amplitude modulation
    Working voltage(V): DC5V
    The static current(mA): 4.5mA
    Working frequency(MHz): 315,433.92MHz(266-433MHz frequency can choose)
    Transmission distance: 50-100 meters(In the field of open receiver sensitivity  -100dbm)
    Encoder types: Fixed code
    Working temperature: -10 ? ~ +60 ?
    Receiving sensitivity (dBm) : -105DB
    With decoding receiver board
    1.The operating voltage DC5V, receiver sensitivity is -98db. Leg 7 bits, respectively, VT, D3, D2, D1, D0, the +5 V and GND. VT is a valid signal high output pin Upon receiving a valid signal, the pin output high, may also drive the relay.
    2.Size: 6.3*1.6*3.9cm/2.48"*0.63"*1.54"
    There are four buttons on the remote control, and respectively correspond to the four data bits to the receiving board output pin D0, D1, D2, and D3 of. Press the buttons transmit signals, the corresponding data bit is output high.

The remote in operation.

To give the remote a test I built a quick circuit up on breadboard and it worked perfectly.

All ready to test.


I used 4 blue LEDs hooked up to the outputs of the board to test the operation of each channel. Each LED already had the resistors soldered on from a previous project so it was just a case of jumpering the LEDs to the outputs and ground then hooking up a +5VDC power supply.


As each button on the fob is pressed the corresponding LED lights up to indicate the output of the receiver.

Conclusions.

For only £2.57 each these remotes are a bargain and can be used for so many things. I have even ordered a couple more to play around with as they will be handy for interfacing with my Arduino and Raspberry Pi.
I just got to decide on what to do with them now, some ideas I've had are for remote controlled household lighting, a light painting remote lighting effect controller and there's another secret project I'm working on that the remote will be perfect for.

Friday, 7 June 2013

A collection of truly amazing photos.

I would like to take a moment to recommend a friends photo collection.
All of his photos are taken in complete darkness using long exposure times with the scene selectively lit with different colours then additional effects are added with a range of different light sources.
Here's some examples of his work
Untitled by Jim Lawn (JimLawn)) on 500px.com
Untitled by Jim Lawn

Untitled by Jim Lawn (JimLawn)) on 500px.com
Untitled by Jim Lawn

Untitled by Jim Lawn (JimLawn)) on 500px.com
Untitled by Jim Lawn

Untitled by Jim Lawn (JimLawn)) on 500px.com
Untitled by Jim Lawn

The full set is available at http://500px.com/JimLawn and is well worth a look.
Enjoy :)

Thursday, 6 June 2013

Light painting & my lights/tools.

I have recently been introduced to long exposure light painting photography. By using long exposure times in complete darkness and lighting the scene with different light sources some spectacular results can be achieved. This picture taken by Jim lawn with my assistance is a good example of the art of light painting.
A light painted weeping willow, taken in complete darkness.
© 
All rights reserved doobiejazz
The light sources or tools to give them their correct name, that I'll be using have been made, hacked from existing lights or bought cheap from Poundland or eBay.

Poundland.

So far I have spent less than £5 on lights and bits from Poundland but I will be making a return visit soon to stock up on more lights and supplies.

Glow sticks.
The packaging says it all.
 I got a tube of 20 slim glow sticks to try and as well as the sticks you get a bag full of connectors to join the glow sticks end to end. I got some good results with 4 of these joined end to end to form a circle and by spinning them in different ways got very different effects.

Glow stick ring rotated away from the camera.
Glow stick ring spun on it's vertical axis.


LED flower lights.
I bought a couple of sets of these. They are a string of 2 red, 2 yellow, 3 green and 3 blue 3mm LEDs with a silicone rubber flower shaped diffuser attached to each LED.


LED flower lights from Poundland.
One set of these lights were bunched together and taped to the battery pack to make a handheld tool that is good for detail work or for waving around to draw with light.
Handheld tool following architectural details.


Handheld tool again, this time waved randomly.
I'm a bit dissapointed with the colour I need to either add more red LEDs or make another one with more red in it.
The other set of lights were left as they came out of the box and are used to spin to get circular trails.
Flower lights spun by their wires.


My creations & hacks.

Blue galaxy tool.
My blue galaxy tool is a string of blue LEDs hooked up to a 555 based variable flasher circuit powered by a 9V pp3 battery. I quickly knocked the circuit up on some vero board with minimal components then entombed in insulation tape to protect the circuitry. I expect the string of lights to get damaged in use so I made the flasher module easily to separate from the string of lights.
My Blue galaxy tool.
 The string of LEDs are spun round quite fast and the resulting effect looks like a galaxy of blue stars. Spinning it at a constant speed gives more a ray type effect where as varying the speed gives a much more random pattern..
Blue galaxy tool in action.
I was hoping for more trails from the LEDs but the on time for the flasher was set just a bit too short. Next version will have adjustable on time built into the controller.


Cold cathode wand tool. 
Cold cathode wand tool.
Cold cathode wand tool Illuminated.
The insides.
I made this from an old PC cold cathode light kit I had knocking about. It runs off a single 9v pp3 battery and is all housed perfectly within an empty Glucagen hypo stop kit case.


Different effects from my cold cathode wand tool.


Hacks I'm working on.
I have a several old bulb torches that I am retrofitting with LEDs instead of bulbs so that way I can have a range of different colour LED torches. I am also hacking an old LED torch to be a selectable colour torch.


Torches I'm hacking
No doubt there will be further Creations and hacks needed as I build up my 'tool kit' which I shall document in future posts.

CHeck back soon for more hacks, creations and craziness.

Monday, 27 May 2013

Solar air heater. Phase 2. Heat exchanger construction.

The build commences...


After collecting the required amount of cans, 72 in my case, I made a start by cutting the bottoms out of the cans with a holesaw.
Cans with the bottoms cut out.


Once all the cans have had the bottoms cut out a decent bead of adhesive was run round the tops,
All glued up.


The cans are then stuck top to bottom to form tubes to the required length.
All 72 cans stuck together into tubes. 
The view inside a tube.


Next I cut out a couple of bits of plywood and cut equally spaced holes to hold the cans these will act as headers to join all the tubes into one unit.
Top and bottom headers.


It was then all dry fitted together to check the fit and alignment.
Top header dry fitted

The headers have not been sealed to the tubes yet as the tubes will need a light sanding to provide a good key for the paint to stick to later, but I'll have to wait until tomorrow for the adhesive to properly cure before sanding.


Next time,  Insulation and case building.

Tuesday, 21 May 2013

A maker group for N.E. Lincolnshire?

I'm considering starting a Makers group up somewhere in Grimsby and am trying to gauge the level of interest to see if there are enough numbers to start a local group. It will be for ages 13+ with no upper age limit and would be a members group with an elected committee.
The group would meet about once a month at a suitable venue to collectively collaborate on make and create projects, anything from card making and knitting right through to gadget hacking and rocketry.
If you would be interested in joining such a group please leave a comment or join our Facebook group, N.E. Lincolnshire Makers & Creators


Please feel free to re-blog this post or to share this with anyone in the area that might be interested as the more people that are interested increases the possibility of the group getting started.

Thanks,
James

Buck Converters


I recently bought a couple of buck converters off eBay for £1.16 each with free delivery from China. The one's I bought were these buck converters that I will be using to regulate a couple of power supplies for different jobs.
One of the buck converters from China.

After realising that not everybody knows what a buck converter is I thought I'd give a quick description here.

Stabilising camera mount design.

After my rather disappointing results trying to get aerial footage from my kite I've designed a mount for the camera. I know I could have Googled a design but for me half the fun is in the design and prototype stages of the project.

I decided against gyroscopic stabilisation, the cost of the three powered precision gyroscopes alone killed that idea pretty quick.
I then remembered an episode of scrapheap challenge from years ago where they had to carry open barrels of paint on a vehicle trying to spill as little as possible and that inspired my design. My idea is for a mass damped stabiliser that should be as simple and quick to construct as possible, no gimbals to make and make use of existing materials.

Sunday, 19 May 2013

Kite videography. Almost a complete failure.

My wife bought me one of those MD80 mini cameras a while back. I've attached it various things in the past, like the car and the dog but I've had several attempts now at getting some decent video with the camera attached to my power kite.
When using a stills camera attached to the kite movement was not an issue with a fast shutter speed but for video it's a completely different can of worms.
I've tried different methods of attaching the camera to the kite, all with varying levels of fail, although today's footage is the best yet.
I've had a quick look for stabilising camera mounts but they all cost several times more than the actual camera itself so I think my next project might be a stabilising mount to attach to the kite.
Anyway here's the video for anybody that wants to watch 4 minutes of blurry scenes with occasional watchable bits.


Thursday, 16 May 2013

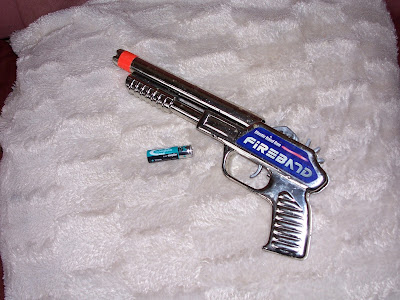
Fireband elastic band gun strip-down and rebuild with extra fire power. Part 1

 Hello, I decided to start a quickie project to keep things going until I collect all the parts for the solar heater.
I have a semi automatic elastic band gun that my Nephew got a hold of and started dismantling so as it needed repairing I thought I would make some `improvements' to it.
The base gun for the project. AA battery for size.

Monday, 13 May 2013

Poundland solar light scavenge.

At the moment Poundland have a range of solar powered garden lights in stock. These lights come in a range of colours and sizes all have more or less the same components inside. The lights I am scavenging parts from are the colour changing solar light.
A £1 source of parts.

Sunday, 12 May 2013

Tools and safety equipment.

I thought I would take a moment to go over the tools that I use and the safety equipment that is required for my projects.
Most jobs only need three tools; a hammer, duct tape & WD40.If it sticks and it shouldn't, WD40. If it should be stuck and isn't, duct tape. Otherwise get the hammer out.

Saturday, 11 May 2013

Solar air heater. Phase 1, Introduction, prototype design and required materials.


After seeing several websites giving instructions on home built solar energy collectors I decided to have a go and build one for myself out of recycled or scavenged materials for as little cost as possible.
I don't know who to credit for the original design as there are so many variations on different sites, but if anyone knows I'll be happy to credit the original designer.

Welcome to my blog - A brief introduction.

Hello, and welcome to my blog.


About my projects.
I decided to start this blog to document some of my hacks, projects and experiments, past and future mostly for my own reference but also to share that information and hopefully inspire people to have a go for themselves. Please be aware that some of my projects use mains power or generate even higher voltages, possibly lethal without actual contact with live parts in some projects therefore I do not recommend anybody try some of the higher voltage projects without experience with high voltages and adequate safety equipment.  
All of my projects use recycled, scrounged or scavenged parts as much as possible, not only to keep costs down but using materials that would often end up in landfill.

My current projects.
I have two projects that I am working on at the moment, a solar air heater and a LED flower lamp. I am still awaiting parts for the LED lamp to arrive from China so I am working on the air heater at the moment.

Past projects.
Here are a few of my past projects that I'll have to revisit.

  • Simple high voltage generator.
  • H.V. Jacob's ladder.
  • Light emitting gherkins.
  • Hydrogen generator.
  • Microwave experiments.


Check back soon when I will be making a start on the solar air heater.
James.